
Using the JWT flow
This guide helps you set up your JWT flow to onboard a new user on AngelList
Overview
AngelList uses the JSON Web Token (JWT) for authentication and information exchange.
A static URL can be called with a base64 encoded JWT in a query param as such:
Production Static URL
https://portal.angellist.com/start/transaction?extToken=${extToken}
Staging Static URL
https://portal-staging.angellist.com/start/transaction?extToken=${extToken}
Before you start
1. Create private-public key pair
For authentication, you will need to generate a private/public key pair using RSA256. RSA256 requires key modulus length to be 2048 bits or larger.
The private key is used to sign the JWT.
The public key is needed for AngelList to verify that the request came from your organization.
2. Send us the public key
Please send the AngelList team the public key with exponent in JWK format.
{
    "kty": "RSA",
    "e": "AQAB",
    "use": "sig",
    "kid": "hHuBYDW67nKB1c3gPkDxHtJ1_7NU11svQKIp4Wc5Nhc",
    "alg": "RS256",
    "n": "ovzBN2aEijJ0LFYGrqzAZL0X8Ghh0oBYe4R6-k6VQDVGlkdhwCdESMMrF1j7jI1rJp8bXjWgVXIyvVVIPDvFJvCF1c0sxHafLt062N073VYI0fzKOztUi8_Wd3gUdy2myi1oEVnq18dn4qjJ3XbfPkIqfq5xIpETLDZWCCu2w6XhegFKiTd6mZWmvNPuoUUV2bwRETU9uXt34qEMloxbtcPFEModO8rwPwKga0SgRizlxjGcnx4sYeyXdzWc6tfqEk4xWS5JM23lV7jcGPjexAKO5w5RAE9Q8K70qquFXvuKrJpulrrIFB8FVth7lHbMzTJBiy9nLNIMfGlwnttB8Q"
}
Step-by-step
1. Create the transaction
The request can only be made for an existing transaction. Use the GraphQL API to create a transaction
2. Create the JWS
This section provides guidelines for creating the JWT. The JWT must be in the JWS Compact format.
Header
The JWT must be signed with the private key you generated in the previous step.
Claims Set
| Field | Required | type | Description |
|---|---|---|---|
iss | ✔️ | string | AngelList organization id for your organization |
sub | ✔️ | string | your organization’s account id or another unique identifier |
aud | ✔️ | string | This should always be "angellist" |
exp | ✔️ | number | Expiration time |
iat | ✔️ | number | Time JWT was issued |
transactionId | ✔️ | string | Transaction Id for initial and returning users |
transmitToken | ✔️ | string | Token from the createTransaction response |
accountEmail | ✔️ | string | Email address of the account. An AngelList user will be created with this email if one does not exist already. |
accountName | string | Name of account. If you are making a request for an account that does not already exist in AngelList, you must provide the accountName. |
Signature
{
"alg": "RS256",
"typ": "JWT"
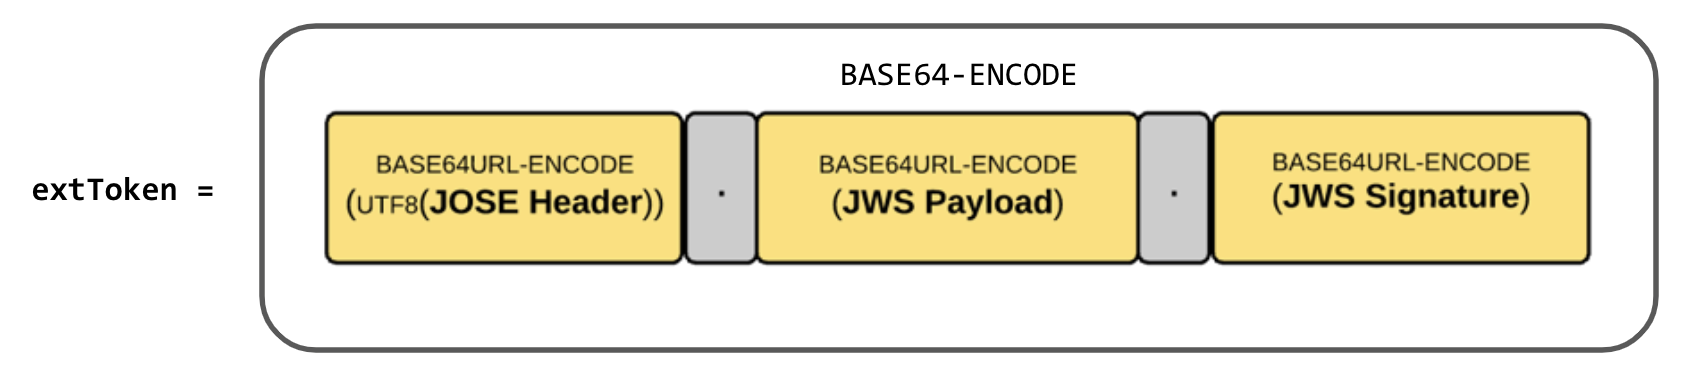
}3. Create the extToken
Apply Base64 encoding on the JWS to create the extToken.
After you create the JWT (in the JWS Compact format), it must be Base64 encoded to create the extToken.
4. Calling the AngelList Static URL
Initial Onboarding
- First-time User clicks the "Start Onboarding" button somewhere on your website.
- You use
createTransactionmutation to create the transaction. - You generate the
extTokenand pass it via query param to the static URL for the environment you are using. - User is redirected to the appropriate transaction page to complete their onboarding tasks.
Resume onboarding
- User logs in to your website.
- User clicks on the "Resume Subscription" button somewhere on your website.
- You generate the
extTokenand pass it via query param to the static URL for the environment you are using. - User is redirected to the appropriate transaction page to complete their onboarding tasks.
- User completes the onboarding tasks.
- AngelList calls your webhook endpoint.
Troubleshooting
Having trouble with implementing the JWT flow? Check out the common errors and how to debug them in Error troubleshooting